

We as a whole appreciate taking photos of the things we love, yet how would you transform those ordinary recollections into professional-quality pictures you can respect for quite a long time to come? Fortunately, BeFunky’s Photo Editor simplifies this. With its broad scope of simple-to-utilize photo altering apparatuses, anybody can create beautiful images without uncommon abilities or specialized mastery.
The most well-known obstacle is knowing precisely where to begin, however. With numerous such photo altering apparatuses readily available, which ones would it be a good idea for you to utilize and in what request? It’s not challenging to become overpowered.
Before you become uncontrollably nervous, don’t worry. Today I’ll walk you through the confident strides for transforming any photo into a magnum opus, alongside the five fundamental altering devices you should use to accomplish this. We’ll utilize this photo for instance:
In Below Five Essential Photo Editing Tips
Stage 1: Crop Photo
The initial step is consistently to trim photos because you would prefer not to sit around idly altering portions of your image that you will not keep. Yet, what precisely is cutting? Consider it like this: when you need to put a photo of your cherished one in your wallet, you frequently trim the picture down, so the fundamental piece of the photo is in plain view. Then, at that point, you eliminate the undesirable fragments of the image to guarantee it puts its best self forward!
There are numerous reasons why you would need to edit an image. For example, editing can eliminate an unwanted detail from a photo, work on the image’s general organization, or change its angle ratio. Bothersome detail in an image is anything you would prefer not to feature in your photo. It can likewise be something that may occupy the watcher (i.e., an individual who meandered into the edge of your shot). Utilize the yield instrument to manage these out of your image!
The arrangement, then again, alludes to how you outlined or situated your shot. What did you catch in the frontal area, center ground, or background? Is your subject at the focal point of your image or out of the way? Think about the yield device as an undetectable casing attracting the watcher’s look to what exactly is generally significant. Do this, and your organization will be on-point! Note; you can bookmark this article about photo editing tips to remind yourself next time reading.
It will help on the off chance that you yield to change an image’s perspective ratio. So put, the viewpoint ratio alludes to the image extent. In this way, for instance, the image’s width is about its tallness. Fortunately, BeFunky’s Photo Editor offers different presets to assist with removing the mystery from getting your harvest measurements and angle ratios right.
Stage 2: Resize Image
The alternative to resizing images is another fundamental yet astounding photo-altering device. You may be pondering, however, for what reason would I need to resize my photo? Cameras are advanced instruments, and they catch images containing a large number of pixels. You can send the record size through the rooftop, so if you wish to utilize your photo on the web, odds are it’ll have to make it more modest to transfer effectively.
Platforms like Facebook will automatically change images to their favored size, bringing down both the goal (the detail an image holds) and the nature of your photo. To control how your image looks, it’s an intelligent thought to resize yourself utilizing our Photo Editor.
Listen to this, however: individuals frequently mistake resizing for trimming and don’t know which one to utilize and when. While trimming eliminates portions of your image, resizing doesn’t. It just adjusts the elements of your photo to make it more significant or more modest. You can utilize trimming in combination with resizing images to assist you with accomplishing the specific print size you’re searching for.
Need to print a small photo to put in your memento? Remove any little subtleties utilizing the yield device, then, at that point, recoil your image down using the resize instrument. Excessively simple! Alternatively, you can resize pictures into the ideal measurements for printing and outlining utilizing our shrewd diagram. It records the most well-known photo-printing sizes, alongside their comparing measurements in pixels.
Tip: Need to manage your photo to get the perspective ratio on the money? That’s the place where the harvesting device proves to be helpful! Note; you can bookmark this article about photo editing tips to remind yourself next time reading.
Stage 3: Understanding Exposure
The term openness gets tossed around a ton in photography, yet what does it mean? So put, it’s the way dim or lights your image shows up once your camera catches it. Getting this right consistently is interesting, however. It boils down to the ideal amiability between the gap, ISO, and screen speed.
At the end of the day, what amount of light your camera allows in? The affectability of your camera’s sensor to this light and the duration of the openness. Here’s the uplifting news: if you’re not content with this, you can undoubtedly change it utilizing the Exposure instrument in BeFunky’s Photo Editor. It permits you to adjust five openness-related components, including Brightness, Contrast, Highlights, Shadows, and Fill Light. I’ve clarified each of these below!
Brilliance: How light or dim is your image? Photos that are either too dim or too light will not have the difference and equilibrium that a great image contains.
Differentiation: the distinction between light and dull in an image. High-difference photos will have brilliant features, dull shadows, and lively shadings. Low-differentiation images contain more subtle qualifications among colors and can seem dull.
Shadows: The haziest areas in a photo. Note; you can bookmark this article about photo editing tips to remind yourself next time reading.
Fill Light: This feature imitates the additional lighting source used to light up shadow regions or hazier areas in altering.
You can apply these settings to your whole photo, or the Paint feature permits you to utilize them for specific pieces of the image, as it were. It is an excellent method to add the show to the spaces that need it most!
Stage 4: Sharpen Image
When you hone photos, it gives them the clearness and difference they need to look astounding. BeFunky’s hone apparatus improves contrast along the edges in your image to make them pop. Alternatively, we additionally offer a Smart Sharpen apparatus. It is based on a ‘more astute’ calculation, permitting it to upgrade sure edges inside the photo that need it most. Note; you can bookmark this article about photo editing tips to remind yourself next time reading.
Read More: Top 5 Web Series To Stream on OTT in 2021
However, an expression of caution to accomplish the sharp photo isn’t to try too hard! Expanding your sharpness to an excessive amount can cause pixelation and unwanted graininess. It’s likewise fundamental you see your image at its precise (100%) size while changing the affectability. It will help if you guarantee you’re getting it to spot on. We’re on the final lap now!
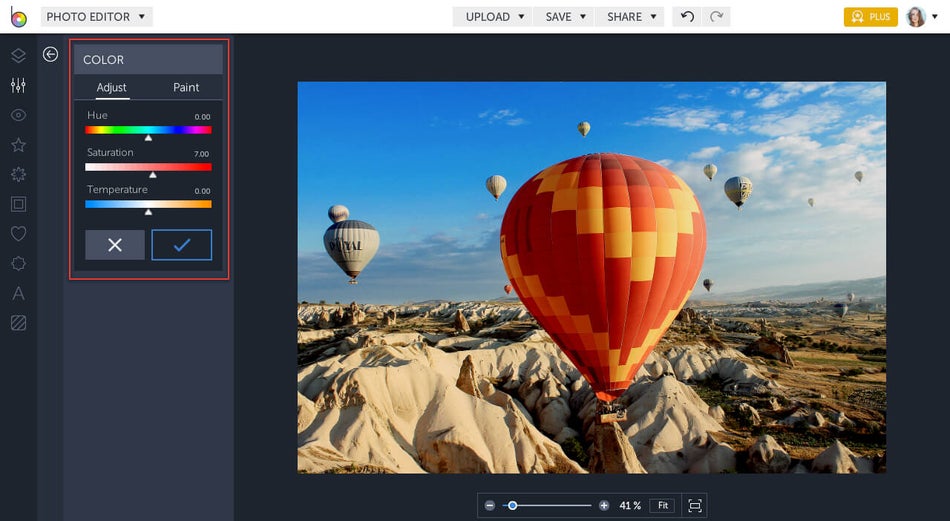
Stage 5: Saturated Color
In case you’re not mindful of what saturation is, it characterizes how extreme the tones are. When you increment the saturation, higher techniques of the shading range are necessary to add, causing the styles to show up more striking. Then again, diminishing saturation adds lower shades of the content to your image, causing its tones to seem blunter. Note; you can bookmark this article about photo editing tips to remind yourself next time reading.
While expanding the saturation of an image can make it pop, you should be mindful to stay away from probably the greatest mix-up of photo altering: oversaturation. Cheeto skin, unnaturally blue skies, and neon green grass are certainly not a decent (or natural) look! All things considered, when you add the appropriate measure of saturation to your photo, it creates a more excellent and eye-catching image that seems reasonable (a.k.a, the ultimate photo altering objective!).
Clipping path benefits at Clipping Path Specialist
Since most disseminating programming oversees everything far eliminated from cutting, this is significant for visual organizers. It is because it works for them. They can throw photographs of your thing into another image without dealing with a white background. Starting from here of view, it permits the substance to conflict with the primary thing.
Clipping path service specialists provide services:
- Clipping path
- Clipping path service
- Background removal
- Image masking
- Drop shadow
- Ghost mannequin
I need to say that this is in opposition to the limitations of your rectangular image. In case you mean to keep some print material, the segment way is significantly more fundamental. It remembers photographs of your things for a magazine and rundown. Similarly, a lone picture results from various courses in the photograph business for different things with colors. Note; you can bookmark this article about photo editing tips to remind yourself next time reading.
1 Comment
Pingback: 5 Things You Need to Remember for Designing Perfect Custom Baseball Trading Pins